Red Rhinestone Nail Charms Set: Pro How-To at Home
Learn salon techniques to apply a red rhinestone nail charms set for long-lasting, professional-looking nail art at home or in the salon.
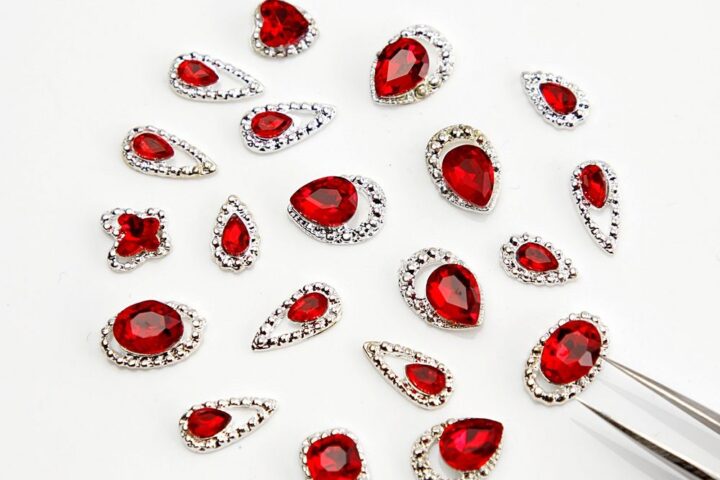
Want salon-worthy nails without leaving home? A red rhinestone nail charms set adds instant drama and dimension—if you apply them correctly. This guide breaks down professional preparation, placement, and finishing techniques you can use with a 20-piece mixed-shape, silver-backed ruby-red charm kit to get consistent, high-end results.
Why choose a red rhinestone nail charms set
Ruby-red rhinestones are a classic choice for bold manicure looks that catch the light and photograph well. The mixed shapes in a compact charm box give you options for accent nails, French-style placements, or all-over bling on statement tips. A set with silver-backed settings pairs cleanly with most polish colors and adds reflective contrast that makes each stone pop.
What’s in the box and how to prepare
Most kits include 20pcs in mixed sizes and shapes, organized for easy selection. Before you start, clear a clean workspace, lay out the stones in order of size, and keep a pair of precision tweezers or a wax picker nearby.
The compact box holds the selection you need for multiple designs—see the Nail Charms ruby red: Nail Charms ruby red. Having the set open and sorted speeds placement and helps avoid dull-looking arrangements caused by random selection.
Step-by-step professional application
- Prep the natural nail: Push cuticles back, lightly buff the nail plate to remove shine, and clean with alcohol or a nail cleanser to remove oils.
- Base and color: Apply a base coat, then two thin coats of your color polish. Dark shades like black or deep burgundy complement ruby-red rhinestones; neutral bases let the stones take center stage. Fully cure if using gel polish.
- Placement planning: Dry-fit stones before glueing. Hold a small cluster up to the nail to check spacing and balance—symmetry often reads more professional than random scattering.
- Adhesive options: Use a gel builder or a dedicated nail glue. For gel systems, place a dab of builder gel where you want each stone, set the stone, then cure. For glue, apply a tiny drop to the back of the stone or the nail and press into place for a few seconds.
- Secure and seal: For larger stones, add a thin bead of gel around the perimeter and cure to reinforce the bond. Finish with a gel or glossy top coat around (not over) large stones to preserve brilliance.
Placement ideas for salon-quality looks
- Accent nail cluster: Place a trio of mixed shapes at the base of one nail for an elegant focal point.
- French tip marquee: Line small stones along the free edge for a luxurious take on the French manicure.
- Centerpiece gem: Use one large ruby-red stone in the center of a nail surrounded by tiny crystals for bridal or event wear.
- Scattered sparkle: Randomly space mixed shapes across a clear or colored nail for a playful, couture feel.
Key features in context
This type of set is valued for its variety and versatility: the mixed shapes let you tailor designs from subtle to dramatic without buying additional stones. The silver backing adds reflective contrast and often helps the red tones read richer under salon lighting. A 20-piece assortment is ideal for experimenting on clients or practicing advanced layouts at home.
Who this set is for
These charms suit nail technicians who want an affordable way to expand their design library and DIYers who want professional results. Because the set contains a mix of shapes and sizes, it’s great for practice, special-occasion looks, and quickly upgrading a basic manicure into a couture design.
Care and safety notes
- Longevity: Proper adhesion and sealing are crucial. Large stones need reinforced gel or a secure glue application to resist catching on fabrics.
- Handling: Stones are small—keep them away from young children and pets to avoid accidental ingestion.
- Removal: Soak-off systems work best for gel-adhered decorations; for glued stones, gentle soaking and careful lifting with a wooden pusher reduce damage to the natural nail.
Pro tips from the salon floor
- Work from the largest stones to the smallest so you can balance the composition as you go.
- Keep a micro brush and a dab of clear gel on hand to correct lashings or to tack down edges before final cure.
- For repeat clients, note their preferred placements and sizes to recreate popular looks quickly.
If you’re sourcing supplies, this style of luxury charm set is commonly available for affordable pricing—the listed price is $5.99 but may change, so check current availability before ordering. You can purchase similar items through Dynamic Nail Supply or other professional distributors.
Conclusion
A red rhinestone nail charms set is a compact, versatile addition for anyone focused on eye-catching nail art. With proper prep, strategic placement, and secure adhesion, you can achieve salon-caliber results at home or elevate service offerings in a studio. Practice placement and finishing techniques on a few nails before committing to a full-hand design—accuracy and restraint often separate a polished look from a cluttered one.